Quantcast
Channel: Softvelum news: Nimble Streamer, Larix Broadcaster and more
Viewing all 436 articles
Browse latest View live

Handling session IP change in Nimble Streamer

$
0
0
Nimble Streamer uses sessions to track users' stats as it's important to see how the content is consumed. It's used in every end-user connection unless you use HTTP origin feature to remove the session identifier.

Every session is based on user IP to be able to distinct them from one another. Normally if a session starts with some IP, it keeps using that IP until the connection is closed. If the original connection IP changes, Nimble Streamer will close the connection because IP change most probably means that someone else uses your session ID which is not good from security standpoint. The viewers with closed connection will get response code 403.

However in some cases the IP change doesn't mean anything bad. For example, if your Android users use Lite mode (also known as Data Saver), Google will use its own proxy servers to accelerate the data usage. Also, your users may use other trusted proxies for their own legit purposes.

For cases like these you may use a few features of Nimble Streamer.

Disable IP check

First of all you may disable session IP check. This can be done using this parameter
restrict_session_ip = false
in nimble.conf. Please read this article for details on parameters' setup and usage.

Once you disable it, your streams' direct links may be used by several viewers so you should use this approach only in case your viewers use trusted proxy servers.


Tune hotlink protection

If you use hotlink protection from WMSAuth paywall feature set and your viewers use proxies as described above, they will get error 403 and you'll find "cannot find hash match" in Nimble logs. That will happen even if you disable session IP check.

So the next thing you should do after disabling restrict_session_ip, is to use different headers for obtaining end-user IP in WMSAuth code for your web page. This can be X_FORWARDED_FOR header or others, depending on your server and proxy software. Read this article regarding proxy usage to learn more about headers' usage.


Let us know if you experience any issues with the described features.

Related documentation


Nimble Streamer configurationWMSAuth paywall, Using paywall with proxy servers,

Constant bitrate and mux rate in UDP streaming

$
0
0
Nimble Streamer has wide feature set for MPEG2TS streaming. This includes full UDP support to allow Nimble Streamer receive and send content via that protocol.

Streaming without bitrate setup

When you stream from Nimble Streamer via UDP, a variable bitrate is used for output by default. You can find all details of UDP streaming setup in this article.

However, in some cases of using DVB/ATSC and other hardware, a lot of ETR101290, CC and PCR errors appear on a regular basis making it hard to use it.

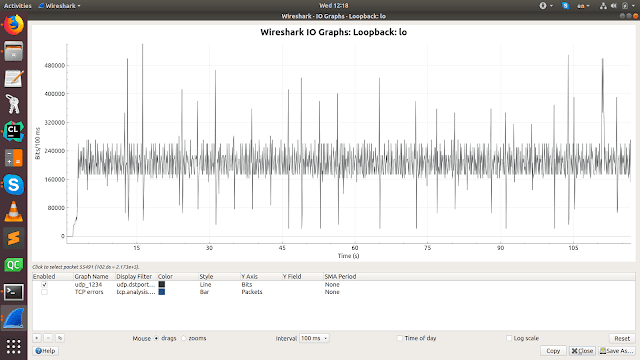
Take a look at this Wireshark session which logged an output of UDP stream.


You can see large spikes which cause problematic behavior on sensitive hardware.

Streaming with mux rate

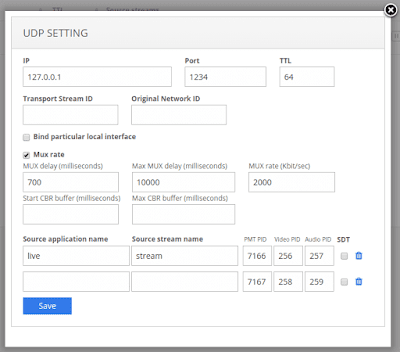
The first step to mitigate this is to specify exact mux rate for outgoing stream to set the upper limit. To specify mux rate parameters, click on "Mux rate" checkbox in UDP settings as shown below.


Here you can define Mux rate field value with the bitrate you'd like to have. Notice that it should be 10% to 20% bigger than your original content. Other mux rate tuning fields like Mux delay and Max mux delay can be specified as well.

Now you can re-start your stream to see how it affected the output. First we looked at the stream using Wireshark with 1 second interval.


It looks much better, however if we select 100ms interval, the picture is much less smooth.


Even though an average bitrate is near the target value, you see the spikes which will still affect many types of hardware.

Streaming with constant bitrate

To set the bitrate on the same level, Nimble Streamer allows setting constant bitrate (CBR). Nimble calculates the exact time interval between packets using MPEG-TS packet size and required bitrate, then sends those packets out strictly at designated time slots.

To enable this behavior, you need to use Start CBR buffer and Max CBR buffer fields. Start CBR buffer field to set how much time Nimble will keep the content after a viewer has requested the transmuxed stream. After that Nimble will start sending the buffered packets with calculated intervals. Max CBR buffer defines a maximum buffer that Nimble Streamer will keep before sending.


The numbers may differ according to your input streams. If your source is an RTMP stream and your network conditions are good, you might use 1000ms Start CBR buffer and 10000ms in Max CBR buffer. Notice that the bigger Start CBR buffer you use, the bigger will be the start-up latency. Max CBR buffer affects how much RAM is used for processing your stream, so if you'd like to optimize your resource usage, you could reduce it.

If you use HLS as an input, those numbers need to be larger as it's a chunk-based protocol. E.g. for standard 10-seconds chunks the start buffer needs to be about 20 seconds and max buffer might be up to a minute long.

With these settings, once we start the input RTMP stream, the 100ms chart in Wireshark looks like this.


Some rare spikes still present once in a while due to system network deviations but the line is generally flat on the target bitrate.

Notice that CBR works only when Nimble Streamer is installed on Linux or MacOS because Windows doesn't allow working with precise intervals required for this technique.

PCR metrics

Overall, according to StreamGuru, when it comes to UDP streaming, Nimble Streamer has PCR accuracy of 100%. While hardware receivers accept up to 500ns PCR drift, Nimble Streamer produces PCR with 0ns drift. Also, PCR interval is <20 ms while 40ms is acceptable by most hardware.


If you have any questions about working with UDP streaming via Nimble Streamer, please contact us.

Related documentation


Using Certbot with Nimble Streamer

$
0
0
Certbot is a popular tool for working with Let's Encrypt certificates. Since Nimble Streamer has full support for SSL-protected streaming let's see how you can use Certbot with Nimble Streamer for your convenience.

1. Set up Certbot


First go to Certbot website and scroll down to "My HTTP website is running" line. Choose "None of the above" option in Software field and then your OS in "System" field.

Let's use Ubuntu 18.04 for our example.

You'll be redirected to https://certbot.eff.org/lets-encrypt/ubuntubionic-other page with necessary instructions.

Follow steps 1 through 4 to install and setup Certbot.

2. Set up certificate


On step 5 - "Install your certificate" - you need to add use your new certificate in Nimble Streamer configuration.

Add these lines to your /etc/nimble/nimble.conf file:
ssl_port = 443
ssl_certificate = /etc/letsencrypt/live/your.domain.name/fullchain.pem
ssl_certificate_key = /etc/letsencrypt/live/your.domain.name/privkey.pem
and then re-start Nimble Streamer with this command:
sudo service nimble restart
You can find more info about nimble.conf on this page.

If you need more complex setup scenario like multiple domains or encryption methods, you can follow this article to set up SSL certificate properly.

By this step, you'll have Nimble Streamer instance running with valid SSL certificate.

3. Set up certificate renewal


The last step will be to set up the automatic renewal of certificate. Certbot does this perfectly, however we'll need to make it call Nimble Streamer for reload the certificate. This can be done via Nimble Streamer native API.

First, set up management API as described on this page under "Starting point: enable API access" point.
Here's an example you can use:
management_listen_interfaces = 127.0.0.1
management_port = 8083
Then re-start Nimble Streamer instance:
sudo service nimble restart

Second step will be to run the renew command as described in "Test automatic renewal" section, with additional post-hook parameter like this:
sudo certbot renew --post-hook 'curl -X POST http://127.0.0.1:8083/manage/reload_ssl_certificates'
Once Certbot renews the certificate it will reload the SSL certificate by making proper API call.


That's it. If you have any questions or issues, feel free to contact us via helpdesk.

Related documentation


SSL setup for Nimble Streamer, Paywall feature set

ABR in SLDP real-time streaming

$
0
0
Streaming media industry currently moves away from RTMP protocol to other real-time streaming technologies due to its future decline. The next generation of technologies tries not just to replace the protocol but also add new features like ABR or new codecs support.

Our team introduced SLDP - Softvelum Low Delay Protocol - as our vision of how real-time streaming should be implemented. Of course, we added capabilities that were missing in RTMP.

ABR capabilities


Adaptive bitrate (ABR) is one of the key features available as part of SLDP. It's supported on both sides of transmission:
  • Nimble Streamer server allows switching per player command among available bitrates which are set up as part of ABR stream
  • SLDP Player provides controls for switching between bitrates if a stream has information about available sub-streams.
Switching of channels may be performed nearly instantly. A player sends command to a server to send media from another bitrate and once the data is received, it takes just a time equal to GOP duration to start displaying a new sub-stream.

SLDP and ABR setup


General process of SLDP playback setup in Nimble Streamer doesn't differ from RTMP playback setup. This article shows step-by-step procedure which is pretty simple with WMSPanel control panel web UI.

ABR setup in Nimble Streamer is described in this article and it's also straight-forward. It includes input streams processing and output setup. Notice the graceful adaptive bitrate stream approach use in Nimble.

If you don't have various renditions from and need to create them from your original stream, you may use our Live Transcoder, and try wildcard setup in particular to simplify this process. Also check this Transcoder video showing the setup process.

If you use Transcoder, you should also perform key frame alignment for all single-bitrate streams. Sometimes when you switch between different stream's renditions you can see a some short glitch. This happens because a player need a new GOP to start the playback. Different streams may have their key frames aligned differently, so each new GOP will start from different point. To avoid that, you need to perform key frame alignment. Use this article to set key frame alignment in your transcoding scenarios.

SLDP Player usage


Having SLDP stream, you can now use our players to provide the playback to your users.

You may use 3 options:

  • HTML5 player provides playback in any browser which supports MSE. This includes basically any Windows or Linux platform. Even Android browsers will allow you to load and play SLDP via HTML5 SLDP player.
  • Android native app provides playback in case you don't want to use web playback on user devices.
  • iOS native app is needed in case you need to play SLDP on Apple mobile devices. You can use it as a fallback for browser player.

All players are free of charge. They also have respective SDKs so you could customize them for your user experience.

SLDP HTML5 player setup also needs these parameters to make full-featured ABR playback:

1. Enable ABR by setting
adaptive_bitrate = true
2. Set initial resolution which you want your uses to see by this setting
initial_resolution = <resolution>
3. If you use key frame alignment as described above, you need to use this parameter to obtain smooth rendition switching:
key_frame_alignment = true
4. You may also use latency_tolerance parameter to tune the streaming latency as described in this article.


That's it. With steps described above you will have full-featured SLDP ABR playback on any platform you need.

Also, you can take a look at the SLDP frequent questions to improve your SLDP usage. And read Reliable Low Latency Delivery with SRT+SLDP post in Haivision blog describing a combination of both protocols for building reliable delivery networks.


Visit SLDP website and contact us in case of any questions regarding SLDP technology usage.

Trigger SCTE-35 marker insertion into live stream

$
0
0
Nimble Advertizer has wide variety of options to insert ads, including inserting ads per SCTE-35 markers. So if your original stream has those markers and your Advertizer is set up to trigger ads for it, your output will have proper ads.

In addition to reacting to available SCTE-35 markers, Nimble Advertizer is able to insert new markers right at the moment you need them using Nimble API. This will trigger almost immediate ads insertion so it's a good way to implement your own "big red button" for per-request ads insertion. Here's how you can do it.

Set up Advertizer


SCTE-35 insertion feature set is part of Nimble Advertizer. So first you need to create and subscribe for Advertizer license.

Then you need to set up Advertizer according to Advertizer tech spec. This includes preparation of ads files and setup configuration. As part the setup, you'll define what streams will be reacting to markers. You can read article explaining SCTE-35 markers handling mechanics, including example of handler response.

Set up Nimble API


Markers insertion is performed via Nimble native API. Use this API page to enable API first and then get familiar with "Insert SCTE-35 marker" call. Try to call that method on some test streams to see how it triggers the insertion of ads.

Use markers insertion


Once you have your Advertizer ready for markers handling and know how to use proper API call, you may develop further setup for triggering ads via API call in your production environment.

Besides immediate insertion via Advertizer, you may pass through the inserted SCTE-35 markers for further processing. Read this article for details of this functionality.


If you find any issues with SCTE-35 feature set, please file us a support ticket so we could help you.

Related documentation


Nimble Advertizer, Inserting ads via SCTE-35 markersNimble Streamer live streaming scenarios, SCTE-35 markers passthrough

Live Transcoder upgrade

$
0
0
Nimble Streamer Live Transcoder was released in early 2016 and since then it has got many useful features which our customers use widely. The core technology of the Transcoder combines both Softvelum team's own know-how and third-parties' work. Those third parties are listed on a corresponding page.

As we add new functionality, some core third-party technologies also advance forward. For instance, FFmpeg which is used for filtering and some decoding operations, has moved from version 3 to version 4, getting some important fixes and improvements. So in order to keep pace with FFmpeg, our team had to make adjustments and use latest version 4.

New FFmpeg version requires changes in both Nimble Streamer and Live Transcoder. So in order to make smooth transition among versions, Nimble and Transcoder packages need to be upgraded simultaneously. If one of the packages is upgraded without its counterpart, then live transcoding will stop working.

So here is what you need to do in order to complete this upgrade the correct way.

For Ubuntu, run this command
sudo apt-get install nimble nimble-transcoder

For Debian, run this command
apt-get install nimble nimble-transcoder

For CentOS, run this command
sudo yum install nimble nimble-transcoder

You may also run procedures from Nimble Streamer upgrade page and Live Transcoder upgrade page one after another do get the same result. If you have Windows, you also need to follow this path.

So we recommend you to perform this simultaneous upgrade when you have time and resource for that.


After the upgrade is complete, your Nimble Streamer package version will be 3.6.0-1 and Live Transcoder package version will be 1.1.0-1.


If you have any questions or face any issues during the upgrade, please contact us using our helpdesk.

Streaming Media Readers' Choice Awards 2019

$
0
0
Streaming Media Europe magazine has started a vote for Readers' Choice Awards 2019.

Softvelum products have been nominated in 6 categories:

  • Analytics/Quality of Service Platform - Softvelum Qosifire
  • Encoding Software - Softvelum Nimble Live Transcoder 
  • Media Server - Softvelum Nimble Streamer
  • Quality Control/Monitoring Platform - Softvelum Qosifire
  • Server-Side Ad Insertion Solution - Softvelum Nimble Advertizer
  • Video Player Solution/SDK - Softvelum SLDP Player

Open the voting page and select our products to vote as shown on a screenshot below. Voting closes on 1st of October. At that point, all voters will receive an email asking them to to confirm their votes and only the confirmed votes will be counted.

Your support is very important for our team, so have a minute to cast your vote for us!

Here's how you can find us in a huge list of nominations and nominees:


Feel free to support our team, every vote matters!

NVidia drivers upgrade issues

$
0
0
Recently some of our Live Transcoder NVENC users have faced specific problems with NVidia usage so we'd like to draw your attention to this cases.

NVENC is a technology which combines capabilities of powerful hardware and sophisticated software drivers which allow using that power for customers' applications. There are cases when software update may change the behavior of hardware and affect your transcoding experience, causing errors and all kinds of related troubles. This month NVidia has released new version of their drivers and that update caused transcoding issues across users. Some of them were users of Nimble Transcoder so our team made proper research to eliminate that problem. Those customers had to roll back to previous drivers version to wait for updates from NVidia.

So here are our recommendations to those customers who use NVidia hardware for their transcoding process.

1. Once you've set up NVENC and Live Transcoder and make it work properly, record NVidia drivers version.

2. Make backups of all NVidia drivers which you use over time.

3. If you'd like to make upgrade to some those components, please make one upgrade at a time. So if you decide to upgrade NVENC and Nimble Streamer, make sure you first upgrade Nimble, then let it work for a few days, and then upgrade NVENC. So going step-by-step must be your key strategy.

4. Whatever component you upgrade, please make regression testing of your existing streams. E.g. you upgrade Nimble and your tests show that your streams are fine, after that you upgrade NVENC and your tests fail (streams are not encoded properly) so in that case you know that driver change has introduced the issue.

5. If some of your components failed after upgrade, make sure you roll back to previous version of that component. Once you do the rollback, don't forget to run your regression testing again.


If you use NVENC in your streaming scenarios, we strongly recommend you to use shared contexts to improve performance. In order to do that, you need to add the following parameters into your Nimble config file:
nvenc_context_share_enable = true
nvenc_context_share_lock_enable = true
Please read NVENC shared context usage article for all related details.


We also recommend to check NVidia developers' forums like this one to keep in touch with changes related to NVENC.

If you have any issues or questions regarding NVENC usage in Live Transcoder, pelase feel free to contact us any time.


Processing DVB subtitles in Nimble Streamer and Transcoder

$
0
0
DVB (Digital Video Broadcasting) subtitles are used for media streaming from various sources via MPEG2TS and HLS. Nimble Streamer allows transferring DVB subtitles from incoming streams to its output.

Enable the DVB subtitles processing for MPEG2TS and HLS streams


If your incoming MPEG2TS or HLS stream has DVB subtitles and you need to have those subtitles to be passed through to output MPEG-TS and HLS, you need to add the following parameter into your Nimble config:
dvb_subtitles_processing_enabled = true
Once you add it and re-start Nimble Streamer, your output HLS and MPEG-TS will have DVB subtitles if your source streams have them.

Passing DVB subtitles through Live Transcoder


If you need to transcode your streams (e.g. make multiple resolutions or put graphics on top) and keep DVB subtitles from the source stream, you'll need to make some additional changes to your transcoding scenarios. Also notice that you must have dvb_subtitles_processing_enabled parameter to be enabled as described above.

Let's take a look at a simple scenario which allows keeping original stream as well as make lower resolutions.


Here you see /live/source stream being processed to get /live/output_480p output stream down-scaled to 480p (via Scale filter box) and keep the original rendition as /live/output_original stream.

There are 2 ways of passing the DVB - via video and via audio pipeline. We'll demonstrate both ways.

The /live/output_original stream has video being passed through - you can see long line with blue-to-orange gradient. This way, if you have full HD stream as input, you won't waste resources decoding and encoding the content to the same rendition. But the audio is split to decoder and encoder. Let's see their settings.


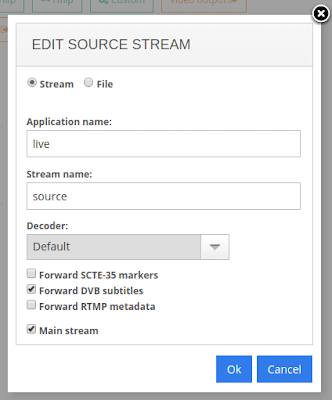
In the source stream decoder you see the enabled Forward DVB subtitles checkbox. It enables the transcoder to grab the subtitles for processing. In audio encoder setting, you click on Expert setup section to see the Forward DVB subtitles checkbox again. Check it to make the encoder take the subtitles which were previously grabbed into the pipeline by the decoder. After saving the transcoder scenario and re-starting the incoming stream, the output will have the DVB subtitles in the result stream.

The /live/output_480p stream has audio being passed through while video is transformed to lower rendition. So here we use video pipeline to pass DVB subtitles. It's set up the same way - both in decoder and encoder elements.


You need to check Forward DVB subtitles checkbox in video decoder and in video encoder settings under Expert setup section. As in case of audio, once you save the scenario and re-start input stream, the output will have the initial DVB subtitles.

Related documentation


Live TranscoderMPEG2TS streamingHLS streaming

Forwarding RTMP Icecast metadata through Live Transcoder

$
0
0
RTMP protocol has the ability to carry Icecast metadata. Nimble Streamer can forward that metadata into output stream when transmuxing from RTMP to Icecast. However some scenarios may require Live Transcoder to be involved in order to transform audio. In this case the metadata from RTMP stream need to be carried through the transcoder pipeline by setting parameters in a transcoding scenario. Let's see how this can be done.

Notice that Nimble Live Transcoder is able to passthrough the Icecast metadata. Please make appropriate setup for respective protocol use case. 
If you have incoming Icecast with Icecast metadata, please follow this instruction and skip this article.
If you have incoming RTMP with Icecast metadata, you need to follow the instruction below.

Enable RTMP Icecast metadata


First, the incoming stream must have the RTMP Icecast metadata delivered. So you need to enable RTMP Icecast metadata processing as described in this article. If you don't set up the designated application or entire server processing the RTMP Icecast metadata, it will not be available for transcoder scenarios.

Set up Transcoder


In this sample scenario we use transcoder for re-sampling audio from the existing RTMP stream. You may see a decoder, then a filter to perform sampling and then an encoder.


The forwarding needs to be specified on both decoder and encoder sides. In the audio decoder element you need to check the Forward RTMP metadata checkbox to set the transcoder to take metadata into the pipeline.


Now go to video encoder element and click on Expert setup.


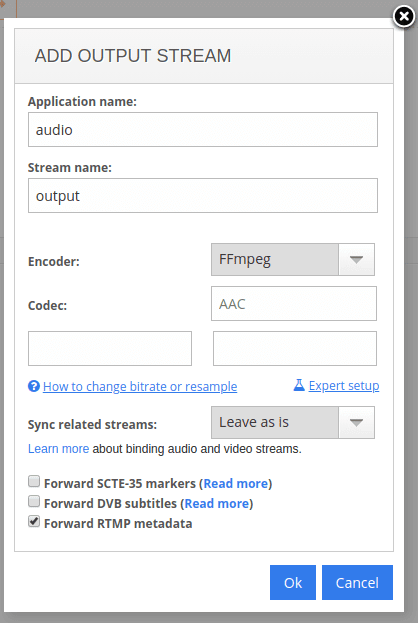
Here you need to check the Forward RTMP metadata checkbox to make the transcoder grab the metadata from the pipeline and make it part of output stream.

Once you save the scenario and re-start the input stream, the output stream will have the metadata which then can be used for transmuxing into Icecast or re-publishing.


Contact us if you have any questions regarding any of our features.


Related documentation


Live Transcoder for Nimble StreamerAudio streaming feature setRTMP support

Generating Icecast metadata from RTMP

$
0
0
Nimble Streamer can re-package incoming RTMP stream into outgoing Icecast stream, it's part of our extensive audio streaming feature set. RTMP protocol has the ability to carry Icecast metadata and Nimble Streamer can pass that metadata from RTMP input to Icecast output.

If you need to process the input RTMP Icecast metadata for further use in Icecast, you need to enable this capability on server or per-application level. If you want to pass the RTMP Icecast metadata through Live Transcoder, you also need to enable it.

To enable the feature globally for entire server, go to Nimble Streamer / Live streams settings menu to open the setup page and choose the required server from the drop-down list. By default, the Global tab will be opened. Here you need to select Icecast protocol to have it in the output. This will show Generate Icecast metadata checkbox which you also need to select as shown below.


If you'd like to define this separately for specific application then choose Applications tab. Click on existing application's settings or click on Add application settings button to create a new one. Its settings will be similar to those described above so you need to select Icecast among protocols and click Generate Icecast metadata checkbox.


Once you save settings and re-start your input RTMP stream, the streams in the affected applications will have the Icecast metadata. You can use it as part of Icecast streaming or for passing through Transcoder scenarios.

Notice that RTMP output streams will have the Icecast metadata regardless or the described setting. This means that if you re-publish such RTMP stream or make it available for further pulled, it will have the Icecast metadata. However if you decide to transcode the stream and keep the Icecast metadata, you'll have to follow this setup process.


Contact us if you have any questions regarding any of our features.


Related documentation


Live Transcoder for Nimble StreamerAudio streaming feature setRTMP support

Larix Screencaster for iOS - live streaming from any app

$
0
0
Softvelum provides a number of solutions for mobile streaming and playback.

Today we introduce Larix Screencaster for iOS.

Larix Screencaster application allows capturing the content of user device and streaming it to the target media server or service. The list of supported protocols includes RTMP/RTMPS, RTSP/RTSPS and SRT, you can stream AVC/H.264 and HEVC/H.265.

Install Larix Screencaster here.

The setup of streaming is similar to Larix Broadcaster, you can read documentation reference for connectivity details.

As for the screen recording part, Apple requires additional setup:

Please study these sources to perform the setup.

Let us know if you have any questions regarding Larix Screencaster or other mobile solutions.

Manual ingest of Icecast metadata into RTMP via API

$
0
0
Nimble Streamer can re-package incoming RTMP stream into outgoing Icecast stream, it's part of our extensive audio streaming feature set. Besides just processing an Icecast stream, Nimble Streamer can handle Icecast metadata in various scenarios, from pass-through to setup via UI and passing Icecast metadata via RTMP.

Now you can also ingest Icecast metadata into any incoming live stream any time via Nimble Streamer native API call, which makes it a real-time metadata injection. Currently only "streamtitle" and "streamurl" metadata parameters are supported. Once the metadata is ingested into the live stream, that data can be used for all RTMP- and Icecast-related scenarios as shown later in this article.

1. Enable RTMP Icecast metadata


To use this real-time injection you need to enable RTMP Icecast metadata feature first.

Follow "Generating Icecast metadata from RTMP" article to set up the processing of Icecast metadata in RTMP for further usage. Basically it's a matter of one checkbox in WMSPanel UI for given server instance or for some specific application.

Once this feature is enabled, any incoming stream will 

2. Enable Nimble API


Nimble Streamer native API allows working directly with server instance in order to get its status and control its behavior in some cases.

To start using it, you need to enable it on server side via configuration file. Please follow Pre-setup section in Nimble Streamer API reference to proceed. Once you have properly set up server, you can run the ingestion.

So whatever app or server you will enable this feature for, the incoming stream will get the metadata which you later will be able to transfer and process via RTMP.

3. Perform the injection


At this point we assume that you have a live stream to ingest metadata into, let it be "live" application and "radio" stream.
Then assuming your management interface is 127.0.0.1 and port is 9999 you can make this POST call:
curl -vvv http://127.0.0.1:9999/manage/icecast_metadata/live/radio -d "{\"streamtitle\":\"News\", \"streamurl\":\"URL2\"}"
This includes /manage/icecast_metadata method with for live/radio stream and set streamtitle and streamurl metadata parameters.

If you don't need to set streamurl you can run it this way:
curl -vvv http://127.0.0.1:9999/manage/icecast_metadata/live/radio -d "{\"streamtitle\":\"News\"}"
to apply streamtitle only.

You can find more about this and other native API methods on API reference page.

Further usage


As we've mentioned before, this metadata injection API call allows adding that data into the live stream, as if it's been ingested by some encoder before that stream entered into Nimble Streamer instance. This means that you may use ingested metadata in any output RTMP or output Icecast processing use case like those:
RTMP will still carry the data outbound as you need.


Contact us if you have any questions regarding any of our features.

Related documentation


Nimble Streamer APIAudio streaming feature setRTMP support

The State of Streaming Protocols - 2019 Q3

$
0
0
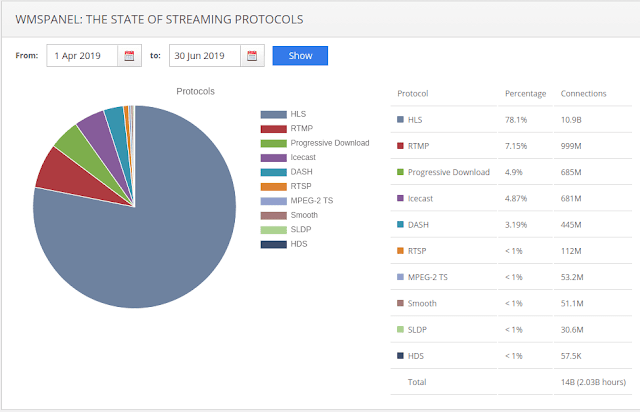
Softvelum team continues analyzing the state of streaming protocols. It's based on stats from WMSPanel reporting service which handles data from Wowza Streaming Engine and Nimble Streamer servers - there were 4000+ servers on average this quarter. WMSPanel collected data about more than 14.5 billion views. Total view time for our server products is 2 billion hours this quarter, or 21+ million view hours per day.

Let's take a look at the chart and numbers of this quarter.

The State of Streaming Protocols - Q3 2019

You can see HLS and RTMP shares are still bouncing around 77% and 8% while other protocols shares haven't been changed much.

You may compare that to the picture of Q2 streaming protocols landscape:

The State of Streaming Protocols - Q2 2019

We'll keep analyzing protocols to see the dynamics. Check our updates at Facebook and Twitter.

If you'd like to use these stats, please refer to this article by original name and URL.

2019 Q3 summary

$
0
0
This quarter our team kept improving our existing products and rolling out new ones.

Vote!

First, our team would like to ask you to vote for Softvelum products in Streaming Media Readers' Choice Awards 2019. You can find us in 6 categories: Analytics/Quality of Service Platform (Softvelum Qosifire), Encoding Software (Softvelum Nimble Live Transcoder), Media Server (Softvelum Nimble Streamer), Quality Control/Monitoring Platform (Softvelum Qosifire), Server-Side Ad Insertion Solution (Softvelum Nimble Advertizer) and Video Player Solution/SDK (Softvelum SLDP Player). We appreciate all votes, your support is important for exposing our solutions and improving our products.
You can vote on this page.

Before moving to certain updates, take a look at these useful articles which give broad view on our products' capabilities:


Let's go to specific pieces, there's a lot to take a look at.

Qosifire updates and free check-up

We keep improving Qosifire live streaming quality monitoring service.


Feel free to sign up and try Qosifire in action.

Larix Screencaster for iOS

We're glad to announce our new application - Larix Screencaster for iOS. It allows capturing the screen and audio of iOS device for further encoding and transmission, and has all streaming capabilities of Larix Broadcaster. Read this article to learn more about setting up iOS screencasting.
The source of iOS Larix Screencaster will be available in the nearest release of iOS Larix SDK. So if you're a subscribed SDK customer, you'll have it as soon as it's out.

We've also updated SLDP Player for Android to add HLS and MPEG-DASH playback via ExoPlayer for convenience of usage and media testing.

Also check latest information about our mobile solutions here.

Upgrades

We always recommend our customers to keep up with our software updates and upgrade Nimble Streamer accordingly.

With recent update of Live Transcoder, we require to make upgrading both Live Transcoder and Nimble Streamer at the same time. We use FFmpeg for decoding and filtering operations and we moved from FFmpeg 3 to FFmpeg 4, hence the correlated upgrade.
So if you have Live Transcoder and you plan upgrading your Nimble Streamer, please follow this upgrade instruction.

NVENC users has had some issues with upgrading NVidia drivers. So we made this detailed instruction which we recommend using during your upgrades.


SCTE-35, DVB and Icecast processing and pass-through

We've released a number of features for Nimble Streamer and Live Transcoder to cover cases when we get some data on top of media stream.


Other Nimble Streamer updates

There were a bunch of features and updates that will be important for many customers.


Last but not least, take a look at The State of Streaming Protocols report for 2019 Q3 showing (no surprise) the domination of HLS.

We'll keep updating you with our new features and products, stay tuned.

Stream availability push API notification

$
0
0
Nimble Streamer provides a variety of APIs and frameworks, including Publish control, Pay-per-view and playback authorization framework, along with other solutions.

Now this tool set has event notifications for incoming live streams' availability, like RTMP and RTSP publish/unpublish events, MPEG-TS streams, Icecast pulled streams and also Live Transcoder output. Nimble Streamer can inform you about the start of stream ingestion and stop of incoming stream.

Why we implemented this as a push API which notifies your handler about all live streams; behavior.

If you want to use the notifications API, the major steps for usage are as follows:
  1. Create a processing script on your web site.
  2. Specify a processing script URL via WMSPanel UI.
  3. Test the solution.
After that, your script will be automatically called each time your Nimble Streamer instances gets proper events.

Let's go step by step to see what you need to do.

1. Create a processing script


Nimble Streamer uses POST request to call your URL. Your script MUST get request body first.

Request body will look differently for different types of calls. Here are examples, with additional formatting, the fields are described below.

RTMP is published into Nimble:
{"ID":"c581b1c2-686a-8140-8deb-f44031fa393f",
  "Signature": "PD94bWwgdmVyc2lvbj0iMS4wIiBlbmNvZGluZz0iVVRGLTg",
  "Puzzle": "42342-33434-343434-34343",
  "publish":[{
      "stream":"live\/4k",
      "protocol":"RTMP",
      "time":1569999976249,
      "type":"push",
      "remote_ip":"127.0.0.1"
    }]}

Nimble started receiving output from Live Transcoder:
{"ID":"c581b1c2-686a-8140-8deb-f44031fa393f",
  "publish":[{
      "stream":"live\/4k_ao_aac",
      "protocol":"ENCODER",
      "time":1569999976374,
      "type":"pull"
    }]}

Icecast stream is not pulled anymore:
{"ID":"c581b1c2-686a-8140-8deb-f44031fa393f",
  "unpublish":[{
      "stream":"live\/4k",
      "protocol":"ICECAST",
      "time":1570000823258
    }]}

Two major types of calls are available:

  • "publish" means that the incoming live stream has appeared in Nimble Streamer input.
  • "unpublish" means the stream is not in the input of Nimble Streamer anymore.

The following fields are used:

  • "stream" shows application and stream name in the call.
  • "protocol" is one of the following values: RTMP, RTSP, ICECAST, MPEG-TS (which covers MPEGTS and also pulled HLS) and ENCODER (output stream of Nimble Live Transcoder)
  • "time" is publish/unpublish event epoch time in milliseconds.
  • "remote_ip" is provided in case the stream is a published, it shows the IP of source.


"Signature" and "Token" is what your script MAY check to make sure that it was Nimble Stream who sent it.
Signature = BASE64(MD5(ID + Puzzle + Token))

You can find a small PHP sample of processing the incoming request in out github samples repo.

2. Set up API in WMSPanel


2.a Global setting

Go to Control / API Settings and choose Global push API tab.


Here you need to use two fields:
  1. Enter handler URL into Streams (un)publish handler URL field;
  2. Click on Enable publish/unpublish notifications checkbox.
After you click Save, the first sync-up will be sent to your handler within several seconds.

API parameters also include Token field as well as Enable mutual authorization check box. Those should be used if you'd like to use signature as described in section 1 above.

2.b Server instance setting

You may also make per-server setup. Just click on Servers push API tab to be able to define same settings for each individual server.

3. Test the complete solution


Now you can set up a testing stream or use existing one to try this feature. Just publish that stream to and get notified by the panel via the script. In the github example above you'll get a new log entry.

WMSPanel provides a test handler you can use for trying your calls. You'll be able to debug your scrip real-time.

Once you test it, you can use it in production together with other API features and frameworks.

Related documentation


Nimble Streamer, RTMP streaming in NimbleWMSPanel API reference, github API code samples

Enable hardware acceleration for Intel Quick Sync on Ubuntu

$
0
0
Nimble Streamer Transcoder supports Intel® Quick Sync technology for encoding acceleration using Intel® processors feature set. Nimble Streamer allows using Quick Sync as AVC/H.264 video encoder in transcoding scenarios.

Once you have Quick Sync installed, the encoding becomes available in our Transcoder.

The instructions below describes how to enable hardware acceleration on Ubuntu 19.04 and later releases.

Install required packages


Run the following command to install required packages on Ubuntu:
sudo apt-get install intel-media-va-driver-non-free libmfx1

Notice hat they are available on 19.04 and later releases.

Set up Nimble Streamer Transcoder


Follow Transcoder Ubuntu installation procedure to install it on your server.
Use Ubuntu 18.04 instruction there as it works fine on 19.04.

This articles describes how to use this encoder: H.264/AVC QuickSync encoder parameters.
After that you'll be all set to use Intel acceleration on Ubuntu with our live Transcoder.


If you face any questions, feel free to contact us for any questions.

Related documentation


Live Transcoder for Nimble Streamer, Live Streaming features, Transcoder support for Intel® Quick Sync,

Intel is a trademark of Intel Corporation in the U.S. and/or other countries.

SRT playback support in SLDP Player

$
0
0
SRT became a popular transport protocol for live streams secure delivery over unreliable network. Softvelum team has been an active contributor to SRT open source community being part of SRT Alliance.

Softvelum products lead products have full support for SRT:

  • Nimble Streamer, a software media server, has rich SRT feature set for receiving and sending live streams via all available transmission modes.
  • Larix Broadcaster, Larix Screencaster and Larix SDK allow streaming from Android and iOS to multiple destinations, including those which support SRT input.

Now we introduce SRT playback support in SLDP Player for Android and SLDP Player for iOS.

Mobile SLDP Players provide low latency consumption of SLDP, RTMP, Icecast, HLS and MPEG-DASH and adding SRT gives more flexibility, robustness and reliability for end-user last-mile playback.

You can get SLDP Player free app in Google Play and AppStore.

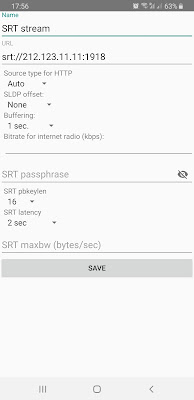
SRT can be obtained via SRT Pull mode, so you need to make sure your source media server or streaming service has SRT Listen mode enabled for the output stream. Read SRT setup description for Nimble Streamer to see how it can be set up there.

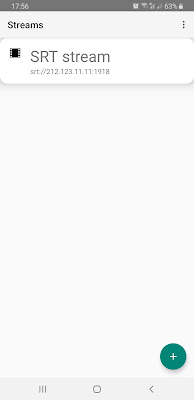
The player setup is easy, just open the application, add new connection and enter your stream with srt:// protocol prefix. Once you save it and tap on it, it will connect to your server and will start playing the stream.


Let us know if you have any questions or suggestions regarding SLDP Player.

WMSPanel API to control push API

$
0
0
Nimble Streamer provides various push APIs which allow controlling the streaming process such as Publish controlPay-per-view or playback authorization.

Typically you set those APIs settings via web UI by opening "Control" -> "API setup" menu.

And now we have API for API setup! You can use "Push API settings" API methods to perform control by making API calls. Please open the respective section of API reference.
It has the following methods:

  • Get global push API settings gives parameters of "Global push API" tab.
  • Set global push API settings sets parameters for "Global push API" tab.
  • Get list of servers push API settings gets list of servers from "Servers push API" tab.
  • Get server push API settings gets parameters of selected server.
  • Set server push API settings sets parameters for a server.
  • Remove server push API settings removes parameters.

So having those you can dynamically control your push API based frameworks.

You can check our Nimble Streamer configuration reference page for more API descriptions.

Related documentation

Wowza Streaming Engine and WMSPanel agent upgrade

$
0
0
Wowza Media Systems has just released Wowza Streaming Engine version 4.7.8 which has a big set of major updates. Softvelum has a wide feature set for this media server so we keep our software up-to-date with all new changes.

After this release, if you install WMSPanel agent using common procedure then it will work fine on any Wowza Streaming Engine version.

If you have WMSPanel agent installed on your server already then it will stop working after this Wowza update.

So if you plan upgrading to the latest Wowza engine release, please follow these steps:
  1. Upgrade Wowza Streaming Engine per Wowza instructions.
  2. Upgrade WMSPanel agent for Wowza using this procedure: https://wmspanel.com/docs/wowza_upgrade
The new WMSPanel agent version number will be no less than 4.0.0.10308 after that.

This will make a smooth transition from WMSPanel reporting viewpoint.

Please contact us if you have any issues or questions.
Viewing all 436 articles
Browse latest View live