Quantcast
Channel: Softvelum news: Nimble Streamer, Larix Broadcaster and more
Viewing all 436 articles
Browse latest View live

Dispersa alerts API

$
0
0
WMSPanel team continues improving Dispersa streams availability monitoring service. After introducing streams monitoring history, we wanted to make Dispersa be more flexible in terms of notification capabilities. As example, people would may want to re-set a stream if it's not visible to the checkpoints, or just send several messages to end-users who use WMSPanel via white label.

Today we introduce push API for Dispersa check-over events. You may now get calls to your handler application from our service when any of your streams are unavailable or available back online again.

Here's how it works.

1. Set up streams to monitor


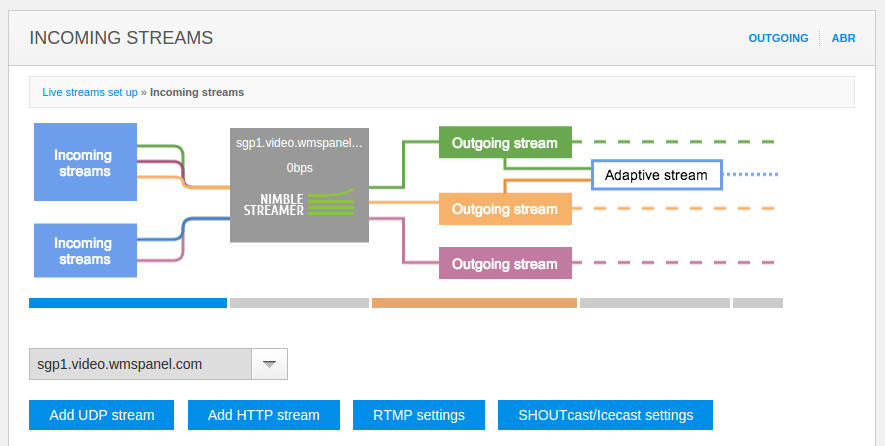
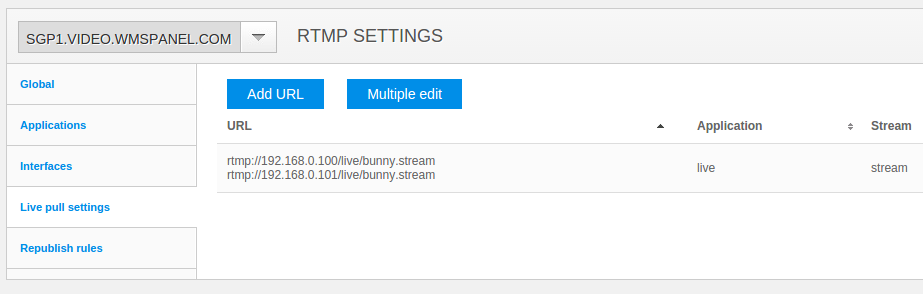
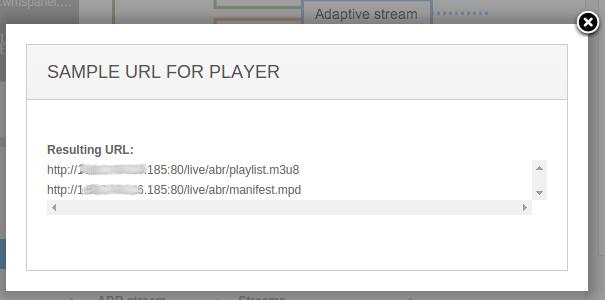
Use this instruction to set up streams which you'd like to monitor via Dispersa distributed network of checkpoints.
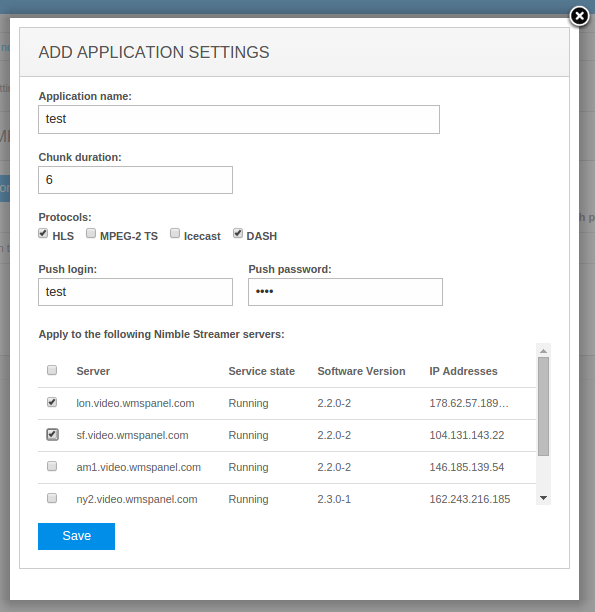
2. Create a handler


A handler is a publicly available web application which can get HTTP POST requests. This might be implemented using any programming technology. Check this example from our streams un-publish notifications for Wowza for to see how this can be done via PHP with PECL packages installed.


3. Set up handler URL in WMSPanel


Now log into WMSPanel and choose Control / API set up menu. Then select Notifications API tab.

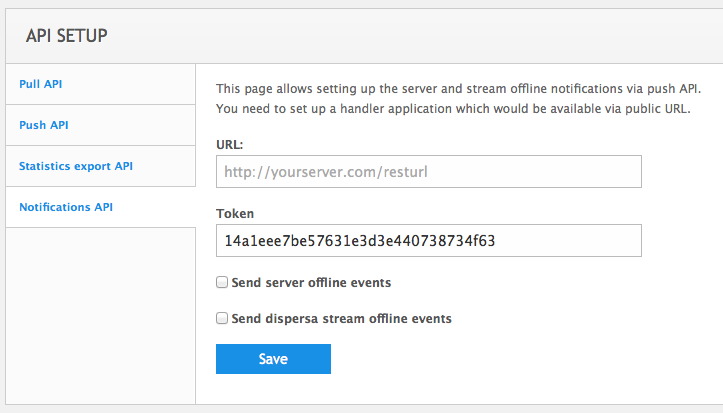
Dispersa notifications push API setup page.
Here you need to enter the URL of your handler and check Send Dispersa stream offline events checkbox. Clicking on Save button you will initiate the monitoring notifications process.

If you'd like to authenticate WMSPanel alerts, you need to get a generated token to use it on step 4.

4. Process status notifications


When any of the streams becomes unavailable or gets online, Dispersa will call handler and post a JSON data containing time of event, a digest (signature), stream full URL and its status.

Here's an example:

{"time":"2014-10-16 03:13:31 UTC","digest":"d93053a1875c034384bb4fb06b20792f","stream":"rtmp://example.com/monitored/stream","status":"offline"}
A status may be "online" and "offline".

A digest is a signature which you may compare on your side by calculating it as "MD5(time + token)", where "time" is the time of receiving the message and "token" is the string which you see in API setup page. It can be used to check the credibility of incoming request.


That's it. You may now create your events' handler to take actions on streams behavior, to notify your users or just collect your own statistics for internal usage. If you'd like to share your ideas about Dispersa improvements, just let us know about it.

Related documentation


Dispersa streams monitoringHow to set up streams availability monitoring, Streams monitoring historyAdding private checkpoints for DispersaAllowing Dispersa to check WMSAuth protected streams, Server offline notifications APIEnd user reporting for media servers


Server offline notification API

$
0
0
WMSPanel gets data about each of the servers being registered in customer account via periodical sync-up which happens each 30 seconds. So when the sync-ups stop, this means that a server is inaccessible and an administrator needs to take some actions. So we've added servers offline notifications to cover that case and to send email alerts when the server goes offline from our panel point of view.

Now we introduce push API for offline notifications. You may now get calls to your handler application from our service when any of your streams are unavailable.

Here's how it works.

1. Create a handler


A handler is a publicly available web application which can get HTTP POST requests. This might be implemented using any programming technology. Check this example from our streams un-publish notifications for Wowza for to see how this can be done via PHP with PECL packages installed.


2. Set up handler URL in WMSPanel


Now log into WMSPanel and choose Control / API set up menu. Then select Notifications API tab.

Server offline notifications push API setup page.
Here you need to enter the URL of your handler and check Send server offline events checkbox. Clicking on Save button you will initiate the monitoring notifications process.

If you'd like to authenticate WMSPanel alerts, you need to get a generated token to use it on step 3.

3. Process status notifications


When any of the servers becomes unavailable, WMSPanel will call your handler and post a JSON data containing time of event, a digest (signature), server name and the status.

Here's an example:

{"time":"2014-10-16 03:13:31 UTC","digest":"d93053a1875c034384bb4fb06b20792f","server":"edge1.example.com","status":"offline"}
A status may be "offline" only for now.

A digest is a signature which you may compare on your side by calculating it as "MD5(time + token)", where "time" is the time of receiving the message and "token" is the string which you see in API setup page. It can be used to check the credibility of incoming request.

This will work for any of the server types supported by WMSPanel reporting.

That's it. You may now create your events' handler to take actions on servers behavior, to notify your users or just collect your own statistics for internal usage. Let us know is you have any ideas or questions about this feature usage.

Related documentation


Dispersa streams monitoring, Servers downtime email notificationsNotifying on RTMP stream (un)publishEnd user reporting for media servers

Daily statistics API

$
0
0
One of the most popular statistics for media servers in WMSPanel is daily statistics report. As our customers want to integrate our stats into their of workflow, our team provides pull API for obtaining the aggregated data.
Now we've made a pull API for daily stats in order to give more flexibility in data analysis.

All you need is to make some setup on WMSPanel side and then make proper API calls using any programming technology you like. Let's go step by step.

1. Set up API on WMSPanel side


To start using the API, you need to make small setup on WMSPanel side.

First, the API should be enabled by WMSPanel team, so please contact us to enable it for your account. Then you need to follow these steps:
  1. Go to Control menu -> API setup -> Pull API tab.
  2. Copy Client ID for further usage in your scripts.
  3. Click on "Generate New Key" to copy API key as well. This will be used for further authorization.
  4. Populate white list with IPs of the hosts where you will be making API call from, like your development machine or your web server. Just enter new IP and click on "Add IP to Whitelist" one by one.
Check this screenshot as a reference:


Setting up pull API parameters.

Another way for getting API ID and API key is to define them for separate users. This is useful when your client want to have direct access to his data. Read this article to learn more about it. Once you create user-specific ID and key, he may use them instead of account-wise client ID and API key. The data scope for this client ID and key will be limited to the client's data slices settings. All parameters mentioned below remain the same.

Now you're ready to request the data.

For daily stats you will need 2 API calls.

  • Take data slices list for further operations. It will give IDs of slices for further re-use in other calls.
  • Request data for the selected data slice and dates range.

Each call is a GET request via HTTPS. You need to use HTTPS for all connections.
As a response you get JSON structure with required data.

If you have incorrect credentials for any request, the response code will be 403.

2. Get data slices list


You need to know your data slice ID in order to request stats for it. This ID does not change over time so you may obtain it just once and use it going forward.

Request URL:
https://api.wmspanel.com/v1/data_slices

Request parameters:
  • client_id - is [client_id] you've copied previously from UI
  • api_key - is [api_key] from UI
Request example:
https://api.wmspanel.com/v1/data_slices?client_id=[client_id]&api_key=[api_key]

Response example:
{
  "status" : "Ok",
  "data_slices" : [
    {
      "id" : "53e03c9978a6fc8596000001",
      "name" : "Full data slice"
    },
    {
      "id" : "53e03ca678a6fc8599000001",
      "name" : "DS2"
    }
  ]
}
Each data slice is described with the name and its unique ID for further usage.


3. Get daily stats


Request URL:
https://api.wmspanel.com/v1/daily_stats

Request parameters:

  • client_id - is [client_id] you've copied previously from UI
  • api_key - is [api_key] from UI
  • from - report beginning date, the format is YYYY-MM-DD, e.g. 2014-08-01
  • to - report ending date with the same format, like 2014-12-31
  • data_slice - the "id" which you got from the previous request. If you have user-based authorization, then this parameter is optional - in this case the data will be selected by the slice where a user is assigned to.

Optional parameters:

You may also request data for separate server, just as you can in web UI.
  • server - is the ID of the server to filter data for. To get server ID, choose Servers menu, then go to server details and check its URL - the big ID would be the line you need. If no server is specified in request, the data is presented as described above.


Request example:
http://api.wmspanel.com/v1/daily_stats?client_id=[client_id]&api_key=[api_key]&from=2014-01-01&to=2014-12-31&data_slice=53e03ca678a6fc8599

Response example:

{
  "status" : "Ok",
  "stats" : [
    {
      "message_out" : 0,
      "mgh_viewers" : 0,
      "rtmp_viewers" : 39,
      "message_lost" : 0,
      "max_message_in_rate" : 51425008,
      "total_view_time" : 31044,
      "max_message_out_rate" : 370556200,
      "dvr_viewers" : 0,
      "date" : "2014-10-17",
      "dash_viewers" : 0,
      "message_in" : 0,
      "ice_viewers" : 0,
      "rtsp_viewers" : 6,
      "smooth_viewers" : 0,
      "viewers" : 96,
      "pd_viewers" : 0,
      "hds_viewers" : 0,
      "hls_viewers" : 51
    },
    {
      "message_out" : 0,
      "mgh_viewers" : 0,
      "rtmp_viewers" : 0,
      "message_lost" : 0,
      "max_message_in_rate" : 0,
      "total_view_time" : 17460,
      "max_message_out_rate" : 127307424,
      "dvr_viewers" : 0,
      "date" : "2014-10-20",
      "dash_viewers" : 0,
      "message_in" : 0,
      "ice_viewers" : 0,
      "rtsp_viewers" : 0,
      "smooth_viewers" : 0,
      "viewers" : 16,
      "pd_viewers" : 0,
      "hds_viewers" : 0,
      "hls_viewers" : 16
    }
  ]
}
Response fields:
  • date - the day for which the data is exposed
  • viewers - amount of connection
  • hls_viewers - amount of connections via HLS
  • hds_viewers - HDS connections
  • smooth_viewers - SmoothStreaming connections
  • rtsp_viewers - RTSP connections
  • rtmp_viewers - RTMP connections
  • mgh_viewers - MPEG-DASH connections
  • dvr_viewers - DVR connections
  • ice_viewers - Icecast connections
  • pd_viewers - progressive download connections
  • message_in - incoming traffic
  • message_out - outgoing traffic
  • message_lost - lost traffic
  • max_message_in_rate - maximum incoming bandwidth (transmission speed)
  • max_message_our_rate - maximum outgoing bandwidth (transmission speed)
  • total_view_time - total amount of view time

Q: I cannot run API call from command line.

A: Please check this FAQ forum post.


More APIs to come soon, so if you want to have more, just let us know about it.


Duration statistics API

$
0
0
WMSPanel provides various statistics for media servers which include playback duration statistics. As our customers need to integrate these stats into their of workflow, our team provides pull API for obtaining the aggregated data.
We introduce a pull API for duration metrics to give more flexibility in data analysis.

All you need is to make some setup on WMSPanel side and then make proper API calls using any programming technology you like. Let's go step by step.

1. Set up API on WMSPanel side


To start using the API, you need to make small setup on WMSPanel side.

First, the API should be enabled by WMSPanel team, so please contact us to enable it for your account. Then you need to follow these steps:
  1. Go to Control menu -> API setup -> Pull API tab.
  2. Copy Client ID for further usage in your scripts.
  3. Click on "Generate New Key" to copy API key as well. This will be used for further authorization.
  4. Populate white list with IPs of the hosts where you will be making API call from, like your development machine or your web server. Just enter new IP and click on "Add IP to Whitelist" one by one.
Check this screenshot as a reference:


Setting up pull API parameters.

Another way for getting API ID and API key is to define them for separate users. This is useful when your client want to have direct access to his data. Read this article to learn more about it. Once you create user-specific ID and key, he may use them instead of account-wise client ID and API key. The data scope for this client ID and key will be limited to the client's data slices settings. All parameters mentioned below remain the same.

Now you're ready to request the data.

For daily stats you will need 2 API calls.

  • Take data slices list for further operations. It will give IDs of slices for further re-use in other calls.
  • Request duration data for the selected data slice and dates range.

Each call is a GET request via HTTPS. You need to use HTTPS for all connections.
As a response you get JSON structure with required data.

If you have incorrect credentials for any request, the response code will be 403.

2. Get data slices list


You need to know your data slice ID in order to request stats for it. This ID does not change over time so you may obtain it just once and use it going forward.

Request URL:
https://api.wmspanel.com/v1/data_slices

Request parameters:
  • client_id - is [client_id] you've copied previously from UI
  • api_key - is [api_key] from UI
Request example:
https://api.wmspanel.com/v1/data_slices?client_id=[client_id]&api_key=[api_key]

Response example:
{
  "status" : "Ok",
  "data_slices" : [
    {
      "id" : "53e03c9978a6fc8596000001",
      "name" : "Full data slice"
    },
    {
      "id" : "53e03ca678a6fc8599000001",
      "name" : "DS2"
    }
  ]
}
Each data slice is described with the name and its unique ID for further usage.


3. Get duration statistics


Request URL:
https://api.wmspanel.com/v1/duration_stats

Request parameters:

  • client_id - is [client_id] you've copied previously from UI
  • api_key - is [api_key] from UI
  • from - report beginning date, the format is YYYY-MM-DD, e.g. 2014-08-01
  • to - report ending date with the same format, like 2014-12-31
  • data_slice - the "id" which you got from the previous request. If you have user-based authorization, then this parameter is optional - in this case the data will be selected by the slice where a user is assigned to.

Optional parameters:

You may also request data for separate server, just as you can in web UI.
  • server - is the ID of the server to filter data for. To get server ID, choose Servers menu, then go to server details and check its URL - the big ID would be the ine you need. If no server is specified in request, the data is presented as described above.

Request example:
http://api.wmspanel.com/v1/duration_stats?client_id=[client_id]&api_key=[api_key]&from=2014-01-01&to=2014-12-31&data_slice=53e03ca678a6fc8599

Response example:

{
  "status" : "Ok",
  "stats" : [
    {
      "up_to_20_secs" : 3,
      "up_to_2_hours" : 0,
      "more_than_3_hours" : 0,
      "total_view_time" : 31044,
      "up_to_15_secs" : 0,
      "up_to_15_mins" : 15,
      "up_to_10_secs" : 0,
      "up_to_5_secs" : 0,
      "date" : "2014-10-17",
      "up_to_5_mins" : 63,
      "up_to_1_hour" : 3,
      "up_to_30_secs" : 6,
      "up_to_30_mins" : 6,
      "viewers" : 96,
      "up_to_3_hours" : 0,
      "up_to_25_secs" : 0
    },
    {
      "up_to_20_secs" : 0,
      "up_to_2_hours" : 0,
      "more_than_3_hours" : 0,
      "total_view_time" : 17460,
      "up_to_15_secs" : 0,
      "up_to_15_mins" : 0,
      "up_to_10_secs" : 0,
      "up_to_5_secs" : 0,
      "date" : "2014-10-20",
      "up_to_5_mins" : 4,
      "up_to_1_hour" : 4,
      "up_to_30_secs" : 4,
      "up_to_30_mins" : 4,
      "viewers" : 16,
      "up_to_3_hours" : 0,
      "up_to_25_secs" : 0
    }
  ]
}
Response fields:
  • date - the day for which the data is exposed
  • viewers - total amount of connections
  • total_view_time - total amount of view time
  • up_to_5_secs - number of connections for up to 5 seconds
  • up_to_10_secs - number of connections more than 5 seconds up to 10
  • up_to_15_secs - up to 15 seconds
  • up_to_20_secs - up to 20 seconds
  • up_to_25_secs - up to 25 seconds
  • up_to_30_secs - up to 30 seconds
  • up_to_5_mins - up to 5 minutes
  • up_to_15_mins - up to 15 minutes
  • up_to_30_mins - up to 30 minutes
  • up_to_1_hour - up to 1 hour
  • up_to_2_hours - up to 2 hours
  • up_to_3_hours - up to 3 hours
  • more_than_3_hours  - more than 3 hours

Q: I cannot run API call from command line.

A: Please check this FAQ forum post.


More APIs to come soon, so if you want to have more, just let us know about it.


Players and devices statistics API

$
0
0
WMSPanel gives statistics for media servers which include statistics for players and devices. As our customers need to integrate these stats into their of workflow, our team provides pull API for obtaining the aggregated data.
We introduce a pull API for players and devices metrics to give more flexibility in data analysis.

All you need is to make some setup on WMSPanel side and then make proper API calls using any programming technology you like. Let's go step by step.

1. Set up API on WMSPanel side


To start using the API, you need to make small setup on WMSPanel side.

First, the API should be enabled by WMSPanel team, so please contact us to enable it for your account. Then you need to follow these steps:
  1. Go to Control menu -> API setup -> Pull API tab.
  2. Copy Client ID for further usage in your scripts.
  3. Click on "Generate New Key" to copy API key as well. This will be used for further authorization.
  4. Populate white list with IPs of the hosts where you will be making API call from, like your development machine or your web server. Just enter new IP and click on "Add IP to Whitelist" one by one.
Check this screenshot as a reference:


Setting up pull API parameters.

Another way for getting API ID and API key is to define them for separate users. This is useful when your client want to have direct access to his data. Read this article to learn more about it. Once you create user-specific ID and key, he may use them instead of account-wise client ID and API key. The data scope for this client ID and key will be limited to the client's data slices settings. All parameters mentioned below remain the same.

Now you're ready to request the data.

For daily stats you will need 2 API calls.

  • Take data slices list for further operations. It will give IDs of slices for further re-use in other calls.
  • Request duration data for the selected data slice and dates range.

Each call is a GET request via HTTPS. You need to use HTTPS for all connections.
As a response you get JSON structure with required data.

If you have incorrect credentials for any request, the response code will be 403.

2. Get data slices list


You need to know your data slice ID in order to request stats for it. This ID does not change over time so you may obtain it just once and use it going forward.

Request URL:
https://api.wmspanel.com/v1/data_slices

Request parameters:
  • client_id - is [client_id] you've copied previously from UI
  • api_key - is [api_key] from UI
Request example:
https://api.wmspanel.com/v1/data_slices?client_id=[client_id]&api_key=[api_key]

Response example:
{
  "status" : "Ok",
  "data_slices" : [
    {
      "id" : "53e03c9978a6fc8596000001",
      "name" : "Full data slice"
    },
    {
      "id" : "53e03ca678a6fc8599000001",
      "name" : "DS2"
    }
  ]
}
Each data slice is described with the name and its unique ID for further usage.


3. Get players statistics


Request URL:
https://api.wmspanel.com/v1/players_stats

Request parameters:

  • client_id - is [client_id] you've copied previously from UI
  • api_key - is [api_key] from UI
  • from - report beginning date, the format is YYYY-MM-DD, e.g. 2014-08-01
  • to - report ending date with the same format, like 2014-12-31
  • data_slice - the "id" which you got from the previous request. If you have user-based authorization, then this parameter is optional - in this case the data will be selected by the slice where a user is assigned to.

Optional parameters:

You may also request data for separate server, just as you can in web UI.
  • server - is the ID of the server to filter data for. To get server ID, choose Servers menu, then go to server details and check its URL - the big ID would be the ine you need. If no server is specified in request, the data is presented as described above. If the stream ID is specified with server ID, this will show real-time stats for specific stream on a specific server.

Request example:
http://api.wmspanel.com/v1/players_stats?client_id=[client_id]&api_key=[api_key]&from=2014-01-01&to=2014-12-31&data_slice=53e03ca678a6fc8599

Response example:

{
  "status" : "Ok",
  "stats" : [
    {
      "Safari" : 9,
      "Unknown" : 45,
      "date" : "2014-10-17",
      "MSIE" : 3,
      "Flash" : 39
    },
    {
      "Safari" : 12,
      "Unknown" : 0,
      "date" : "2014-10-20",
      "MSIE" : 4,
      "Flash" : 0
    }
  ]
}

Response fields:
  • date - the day for which the data is exposed
  • Unknown - total amount of connections from unknown players
  • Flash  - total mount of Flash players
  • Safari, MSIE, Chrome etc. - numbers of connections for known browsers and players.
If some players were not used, they won't appear in results.
If some day does not have results, won't appear in results.

4. Get devices statistics


Request URL:
https://api.wmspanel.com/v1/devices_stats

Request parameters:

  • client_id - is [client_id] you've copied previously from UI
  • api_key - is [api_key] from UI
  • from - report beginning date, the format is YYYY-MM-DD, e.g. 2014-08-01
  • to - report ending date with the same format, like 2014-12-31
  • data_slice - the "id" which you got from the previous request. If you have user-based authorization, then this parameter is optional - in this case the data will be selected by the slice where a user is assigned to.

Optional parameters:

You may also request data for separate server, just as you can in web UI.
  • server - is the ID of the server to filter data for. To get server ID, choose Servers menu, then go to server details and check its URL - the big ID would be the ine you need. If no server is specified in request, the data is presented as described above. If the stream ID is specified with server ID, this will show real-time stats for specific stream on a specific server.

Request example:
http://api.wmspanel.com/v1/devices_stats?client_id=[client_id]&api_key=[api_key]&from=2014-01-01&to=2014-12-31&data_slice=53e03ca678a6fc8599

Response example:

{
  "status" : "Ok",
  "stats" : [
    {
      "iPhone" : 6,
      "iPad" : 6,
      "Macintosh" : 3,
      "Unknown" : 21,
      "Linux" : 12,
      "date" : "2014-10-17",
      "Windows" : 48
    },
    {
      "Unknown" : 0,
      "date" : "2014-10-20",
      "Windows" : 16
    }
  ]
}

Response fields:
  • date - the day for which the data is exposed
  • Unknown - total amount of connections from unknown devices
  • Windows, Linux etc. - total mount of connections from mentioned OSes
  • iPad, iPhone, SmartTV etc. - total mount of connections from mentioned devices

If some devices were not used, they won't appear in results.
If some day does not have results, won't appear in results.

Q: I cannot run API call from command line.

A: Please check this FAQ forum post.


More APIs to come soon, so if you want to have more, just let us know about it.


RTMP pulled streams fallback

$
0
0
RTMP to HLS transmuxing is one of the major capabilities of Nimble Streamer. It allows producing HLS with high efficiency and low resources consumption which allows building robust streaming solutions. However, Nimble is just a link in delivery chain and other elements like source transcoder or origin server may go down. This is why a robust live streaming network needs to have multiple media sources. And Nimble Streamer needs to handle all fallback sources and still produce HLS with no interruptions.

This is why Nimble Streamer team introduces RTMP pull sources fallback support. This also works fine for Icecast streams as well.

When you define RTMP pull streams, you just specify 2 or more sources of the same pulled stream and if the first stream goes down, other stream will be picked up for processing.

To set this up you need to follow basic setup steps described in Pull RTMP to HLS transmuxing article. The main enhancement is multiple edit boxes in Live pull settings for adding new pull URL.


Being in the list of pulled streams, you can click on Add URL and see the following dialog.


Here the URL is a mandatory field while Fallback URLs can be added one by one, regardless of their number. Saving the settings will launch the RTMP to HLS processing.

With this feature you can easily handle RTMP failover in case of any origin source availability problems. Please check other live streaming and streaming infrastructure features available in Nimble Streamer and let us know if you face any questions or issues.

Related documentation


Nimble StreamerPull RTMP to HLS transmuxingRTMP republishing via NimbleEasy ABR HLS setup from RTMPPay-per-view for Nimble StreamerStreaming VOD with Nimble StreamerABR HLS VOD via SMILPublish RTMP from Wowza to NimbleTransmuxing RTMP to Icecast and ShoutcastTransmuxing Icecast to HLS and MPEG2TS

Publishing RTMP from Nimble Streamer to Fastly CDN

$
0
0
Nimble Streamer is a media server which can be used both as origin server and as an edge for end-users delivery. Some customers prefer using it as an origin server only and have content delivery network (CDN) to bring streaming media to viewers.

One of the CDNs which our customers use is Fastly CDN. It provides streaming media delivery network so our customers create Nimble Streamer origin and publish their media into Fastly. Here is a brief instruction about how you can make the setup using WMSPanel products.

1. Set up RTMP streaming in Fastly settings.


First, request support team to enable it. Then define your stream name and the stream key for authenticating your media. Use the "How do I publish a live stream?" article for details.

2. Set up Nimble Streamer


First, install Nimble Streamer if you still haven't done that yet.

Now, define RTMP streaming as described in "RTMP republishing via Nimble Streamer" article. As a result you'll have incoming and outgoing streams for further processing.

The specific step to set up Fastly streaming is the re-publishing setting. In the Live streams set up menu go to server details and its RTMP settings. There you need to choose Republishing rules tab to see the setup options.


Click on Add button to get a setup dialog to set up republishing.

Setup dialog for publishing RTMP to Fastly CDN.
The fields values will be as follows.

  • The "Source application" and "Source Stream" are the app and the stream which you made as the Nimble Streamer output.
  • Where "Destination address" will be the ingest point you selected in Fastly settings.
  • "Destination application" is the name of Fastly live streaming application.
  • "Destination stream" is your Fastly stream name with the stream key

You may also click on Multiple edit to see the text settings editing dialog and get these lines for the settings above:
[
  {
    "auth_schema": "NONE",
    "dest_addr": "ash.ingest.fastly-streams.com",
    "dest_app": "live",
    "dest_app_params": "",
    "dest_login": "",
    "dest_password": "",
    "dest_port": "1935",
    "dest_strm": "yourstreamname?key=mhhYOApVGGKKqXyzJetcetc",
    "src_app": "live",
    "src_strm": "yourstreamname"
  }
]
The multiple edit is very convenient for the cases like:

  • Moving settings between the servers in your account - you just copy these line, go to next server settings and paste then there.
  • Adding publishing settings for multiple streams. If you have dozens of streams, it's easier to work with text settings rather than clicking through the dialog boxes.
  • Adding multiple Fastly ingestion points for robustness purposes.

The latter cases, you can append similar settings separated by comma.

RTMP publishing into multiple ingest points of Fastly CDN.

Once the settings are saved, the stream will be published into the CDN and your viewers may enjoy the media.

This is one of the cases where Nimble Streamer can handle live streaming scenarios. Learn more about Nimble live streaming and contact us if your streaming scenarios need any updates of described functionality.

Related documentation


The State of Streaming Protocols - October 2014

$
0
0
WMSPanel team continues analyzing the state of streaming protocols. October had a lot of connections which means more of interesting content to look at.

We still see the increase of HLS share (now it's 67%). The share of RTMP (23%) and RTSP (9%) has decreased but the absolute number of connections did not go down significantly which means that newcomers preferred HLS. Other protocols did not have significant changes. MPEG-DASH has shown a small growth by several thousands of connections.

All these metrics are calculated based on 870M+ views.

The State of Streaming Protocols October, 2014


You can compare that with September stats to see the increasing share of HLS.

The State of Streaming Protocols September, 2014

These stats are collected from more than 1200 media servers, including Wowza Streaming Engine (mostly 3.x and 4.x flavors), Nimble Streamer, Red5 and nginx-rtmp-module which we recently introduced support for.

We'll keep analyzing protocols to see the dynamics.


This report is brought to you by WMSPanel team.

Nimble Streamer status API

$
0
0
Nimble Streamer is being used in a variety of streaming use cases and scenarios. Many customers use multiple instances for load balancing and robustness purposes. The majority of balancing techniques use geo-location approach or just round-robin balancing to split the incoming requests equally between edges. However this does not guarantee that edge servers will have equal load as some viewers many disconnect from some edges while other edge users will keep watching.

So system administrators who use Nimble Streamer need a way to get status of each server to make real-time decisions about which servers should be processing current incoming requests. Usually this means changing the URL of the media streams on the website so any player would pick it up for playback. This is the most reliable way to make balancing happen regardless of the players' implementations.

This is why we extended common WMSPanel API by adding a pull API to Nimble Streamer itself. A customer may now launch a request to any Nimble instance and get its status and live streaming settings.


Enable API for Nimble Streamer instance


To make Nimble Streamer responding to API requests, the API settings must be set up in /etc/nimble/nimble.conf configuration file. You may check config description to get details about other parameters.

All parameters mentioned below are excluded from config by default.

management_listen_interfaces
This parameter specifies which IP addresses will be used for accepting AI requests. If it's not set, the API requests are not accepted.
Examples:
management_listen_interfaces = *  - all available interfaces are used
management_listen_interfaces = 127.0.0.1, 192.168.0.1

management_port
This one specifies which port is used to listen to API requests. If it's missing, the 8082 port is used.
Example:
management_port = 8086

management_token
This parameters specifies the token (i.e. password) which is used for authorizing API requests. See Making authorized requests section below for details.
If this parameter is missing, there will be no authorization made and anyone will be able to get information.
Example:
management_token = anypassword

Making authorized requests


This is an optional step for the cases when you use management_token parameter for authorizing requests. To make authorized requests you need to make MD5 hash based on the specified token. Please refer to this code sample to see how you can generate this hash.
<?php
$salt= rand(0, 1000000);
$key = "anypassword"; // the token specified in management_token parameter
$str2hash = $salt . "/". $key;
$md5raw = md5($str2hash, true);
$base64hash = base64_encode($md5raw);
$requiest_url = "http://127.0.0.1:8082/manage/server_status?salt=$salt&hash=$base64hash"
echo $request_url;
?>

Get server basic status


This API method allows getting current number of connection and bandwidth (transmission speed) level.

Request URL
/manage/server_status

Response parameters
Connections - number of active connections
OutRate - current transmission speed, bits per seconds

Request example
curl -vvv http://127.0.0.1:8082/manage/server_status

Response example
{"Connections": 10, "OutRate": 125000}

Get RTMP connections status

Request URL
/manage/rtmp_status

Response parameters

  • app - name of application; if there are several applications, they will have their separate sections.
  • streams - list of streams and their parameters
    • strm - stream name
    • bandwidth - transmission speed
    • resolution - video resolution
    • vcoded - video codec spec
    • acodec - audio code spec

Request example
http://127.0.0.1:8082/manage/rtmp_status

Response example
[{"app":"live","streams":[{"strm":"stream","bandwidth":"507882","resolution":"424x240","vcodec":"avc1.66.30","acodec":"mp4a.40.2"}]}]

Get RTMP settings


Request URL
/manage/rtmp_settings

Response parameters
They are nested under RtmpSettings node.
  • hash - response hash
  • interfaces - which interfaces are set to process RTMP streaming
  • login - login for RTMP publishing
  • password - password for RTMP publishing
  • duration - default chunk duration
  • protocols - which protocols' streams are generated as output
  • apps - specific applications' settings
  • abr - individual ABR streams settings
    • app - application name
    • stream - stream name
    • streams - single bitrate streams included into the ABR, each having its app and stream names
Request example
http://127.0.0.1:8082/manage/rtmp_settings

Response example
{"RtmpSettings":{"hash":"1414983917310","interfaces":[{"ip":"*","port":1936}],"login":"","password":"","duration":6,"protocols":["HLS"],"apps":[],"abr":[{"app":"nimble_live_abr","stream":"abrstream","streams":[{"app":"live","stream":"stream"}]}]}}

Get MPEG-TS connections status 


Request URL
/manage/mpeg2ts_status

Response parameters
They are nested under Cameras node. Each stream has entries for

  • id - stream ID
  • st - the stream status
  • tr - processed traffic delta
  • bw - current bandwidth 
  • pmts - processes details


Request example
http://127.0.0.1:8082/manage/mpeg2ts_status

Response example
{"Cameras":[{"id":"5456fab17d5c00547f000002","st":"online","tr":"0","bw":"440623","pmts":[{"id":4096,"pids":[{"pid":256,"t":27},{"pid":257,"t":15}]}]}]}

Get MPEG-TS settings


Request URL
/manage/mpeg2ts_settings

Response parameters

  • CamerasHash - response hash
  • Cameras - information about each stream
    • id - source stream ID
    • ip - IP of the source stream
    • port - source stream port
    • protocol - whether UDP or HTTP is used.


Request example
http://127.0.0.1:8082/manage/mpeg2ts_settings

Response example
{"CamerasHash":"1414986417897","Cameras":[{"id":"5456fab17d5c00547f000002","ip":"127.0.0.1","port":1234,"protocol":"udp"}]}


This set of APIs is the first step to building reliable and robust load balancing. If you have any questions or further use cases which you'd like to cover, let us know about it, any feedback is appreciated. Check also a full Nimble Streamer API reference.

Related documentation


Nimble Streamer, Nimble Streamer API referenceRTMP and MPEG-TS streamingWMSPanel API reference

Flussonic reporting via WMSPanel

$
0
0
With rich reporting capabilities and a number of supported media servers, WMSPanel can be used as a reporting center for many kinds of streaming infrastructure. With white label appearance and API for data extractions it allows integrating itself into any environment.

To extend our capabilities, we've collaborated with Flussonic Media Server team to have full integration of this server into our environment.

Flussonic Media Server is a streaming solution with excellent IP cameras management, DVR feature set, ads insertion, object recognition and many other capabilities.


So now WMSPanel supports Flussonic server stats and provides all reports available for other media servers.To start using this new reporting, follow this installation instruction: https://wmspanel.com/flussonic/install
You will need 4.3.23 or later build of Flussonic.

Having it set up, you'll have server statistics appearing in your dashboard within a few seconds.

If you face any issues or have any questions about this integration, just let us know.


Related documentation


Flussonic Media ServerWMSPanel reporting, WMSPanel API reference

Nimble Streamer performance tuning

$
0
0
Nimble Streamer is created with high performance in mind. Being a native Linux application, Nimble is fast and has low resources consumption. This is why it is chosen for robust high-availability infrastructures and high-speed transmission use cases.

So our customers want to learn more about hardware configuration to be best fit for usage with Nimble Streamer. They also want to know what is their existing hardware capable of when using Nimble.

The description below covers these and other aspects of Nimble Streamer performance tuning. We will refer to Nimble config and its parameters - it is described in Nimble Streamer configuration article.

Calculating RAM amount for live streaming cache


The most used parameter which influences the streaming process is the amount of RAM available for caching. This amount is used for HLS chunks storage.

For each stream, Nimble stores 4 chunks in cache. Once the chunk is out of the playlist, it gets timeout of 45 seconds. So additionally the cache stores several chunks and the number depends on chunk duration. If it's 6 seconds, this would be 4 + 45/6 = 4 + 7 = 11 chunks. For 10 seconds chunks this would be 4 + 45/10 = 4 + 4 = 8 chunks.
The consumed memory amount for those chunks will depend on the bitrate:

RAM size (bytes) = number of chunks * chunk duration * bitrate / 8

I.e. for 1Mbps stream with 6 seconds chunks this would be 8.25MB. If you have an ABR HLS streaming with 512Kbps, 1.5Mbps and 2Mbps, with 10 seconds chunks, your cache amount would be around 40MB.

Notice that this number does not depend on a number of simultaneous viewers.

In addition to cache size you also need to consider the RAM size which your OS will take for network processing. As you can see from this real-life example the OS itself may take a lot more than Nimble Streamer instance.

You may set up RAM cache size parameter via web UI.

CPU-related tuning for high load


CPU consumption of Nimble is very low. However, processing large speed streaming will require additional CPU resources. This is why we introduced worker_threads parameter in the config which defines how many threads will handle the streaming.

On average, 1 core process may handle up to 4 Gbps. If you need more bandwidth you can increase workers appropriately. Number of worker threads should not be larger than total number of processors' cores. Our advice is to keep it as low as possible to process expected bandwidth. E.g. if you have 10 Gbps NIC you should set workers to 3. If you won't have more than 4 Gbps then keep the default value.

In addition, you need to be sure your server can process all available bandwidth dividing IO interrupts between cores. It's not a nimble part but more HW server configuration.

VOD streaming cache control


VOD streaming also requires cache settings. The difference from live streaming is  that VOD cache resides in file system. So if you're doing VOD, you need to use "Max disk cache size" parameter for setting the maximum size for VOD cache. This is done via web UI. You may also need vod_cache_timeout and vod_cache_min_storage_time parameters in config file for TTL of cached chunks.

Please read "Improving cache control for VOD re-streaming" article to learn how to control VOD streaming cache.

Examples


Let's see some common questions coming from our customers.

How many connections can be handled on 2 CPU 512MB RAM server having 1.2Mbps stream with 1Gbps network?
1.2Mbps would require about 10MB of RAM cache. Also, 1Gbps will not require changing worker threads parameter and and 1 extra CPU. So the only limit in this case is the network speed. For given bitrate, the channel will handle 830 connections.

Handling 10 streams, 512Kbps each for approximately 10K viewers, what hardware do I need for that?
From RAM cache perspective, this will take around 42MB RAM cache. However, 10000 viewers will produce 5.1 Gbps bandwidth (i.e. transmission speed). This would definitely need an additional CPU core (making it 2 CPU cores total) and worker_threads parameter set to "2".

The ABR stream has 10 seconds chunks for 240, 360, 480 and 512 Kbps bitrates. What is the cache size for that?
Sum of bitrates is 1.6Mbps. 8 chunks, each 10 seconds, divided by 8 will make 16MB of cache size. You can have 10 streams like that and still not get the limit of the cheapest 512MB RAM virtual machine. With average bandwidth of around 400Kbps, your 10Gbps network will allow you to have around 2500 simultaneous connections but that will depend on the popularity of bitrates.


Contact us if you have any further questions or need some advise on Nimble Streamer usage.

Related documentation


Nimble Streamer, Nimble Streamer APINimble Streamer configurationVOD cache control, Live streaming,

Icecast and MPEG-TS hotlinking protection

$
0
0
WMSPanel paywall framework is the foundation for a variety of content protection systems within environment of our customers. It's available for both Nimble Streamer and Wowza Streaming Engine.

As Nimble Streamer has recently got Icecast and MPEG-TS streaming capabilities we also made changed to the paywall framework to support that. How you may specify Icecast and MPEG-2 TS in the Links re-publishing protection section. This is primarily used for streams hotlink protection as well as for pay-per-view processing.

Protecting HLS, progressive download, Icecast and MPEG-TS against links re-publishing.

Nimble Streamer also provides unique capabilities like domain lock and stream-name based protection for your content.

Please feel free to install Nimble Streamer to try this and other security-related features in action. If you need any help, check our FAQ first and contact us in case of other questions.

Related documentation


WMSPanelNimble StreamerHotlink protection for Nimble StreamerWMSAuth security feature set articlesPaywall for Nimble StreamerPaywall FAQ

Re-streaming SSL-protected HLS

$
0
0
Re-streaming of HLS streams from origin via edge server is one of the most popular features of Nimble Streamer. You can use any origin of HLS media and make it available to large number of viewers because Nimble Streamer is very light-weight and fast. So regardless of origin performance, your infrastructure will be able to handle thousands of viewers with minimum investments.

You may use secure origins so they have SSL protection for HLS traffic and use HTTPS for their connections. Now Nimble Streamer is able to use SSL to communicate to these origins for HLS re-streaming.


The output would be the same as Nimble has now. To make it use SSL, go to Re-streaming setup dialog and click on Use SSL checkbox. for the routes where origin uses HTTPS as shown below.

Set up HLS SSL re-streaming for Nimble Streamer.

Re-streaming is just one of the use cases where Nimble Streamer is used. You can set it up as HLS origin for multi-bitrate live streaming as well as an origin for VOD streaming. It also has RTMP re-publishing feature set which allows setting up efficient live re-streaming across multiple origin-edge servers.

Contact us if you have any questions regarding this or other Nimble Streamer features.

Related documentation


Nimble Streamer, HLS re-streaming via NimbleStreaming VOD with Nimble StreamerPull RTMP to HLS transmuxingRTMP republishingPay-per-view for Nimble Streamer,


The State of Streaming Protocols - November 2014

$
0
0
WMSPanel team continues analyzing the state of streaming protocols. November showed a lot of views which means more of interesting content to look at.

We expectantly see the increase of HLS share (it's 69% now). The share of RTMP (23%) remains the same while RTSP (4.5%) has decreased. MPEG-DASH is showing a growth still having less than 1% overall.

All these metrics calculations are based on 1.88 billion views.

The State of Streaming Protocols November, 2014


You can compare that with October stats below.
The State of Streaming Protocols October, 2014

These stats are collected from more than 1200 media servers, including Wowza Streaming Engine (mostly 3.x and 4.x flavors), Nimble Streamer, Red5, nginx-rtmp-module and Flussonic which we recently introduced support for.

We'll keep analyzing protocols to see the dynamics.


This report is brought to you by WMSPanel team.

MPEG-DASH support for VOD playback in Nimble Streamer

$
0
0
Through past several years, MPEG-DASH has gone a long path from a basic concept to industry standard. Thanks to contributions from a lot of companies and stakeholders, this technology can now be used in a variety of scenarios, including video on demand.

Nimble Streamer team is up for HTTP streaming technologies like HLS or Icecast. So moving towards DASH is a great step forward to better user experience for our customers who would like to try advantages of this HTTP-based protocol.

Today we introduce VOD playback for MPEG-DASH in Nimble Streamer. Is allows transmuxing MP4 files to DASH stream on-the-fly with very low resources consumption.


You can follow these easy steps to set up DASH VOD streaming.

1. Install Nimble Streamer


Use this installation instruction. Or just ask us to install it for you, we can do it free of charge.

2. Prepare content


Upload your MP4 file encoded with H264/AAC to a designated location on the server. The user called "nimble" must have read access to this directory and its contents. Let's say it would be /home/user/video directory

3. Set up VOD streaming


Click on Nimble Streamer -> Edit Nimble Routes menu to open streaming routes setup page.


Clicking on Set up VOD streaming button you will see the following dialog.

Adding VOD transmuxing route for DASH, HLS and progressive download.
In section 1"Where incoming requests are coming" you may see the following fields.

  • Path field contains the URL name part which will then be used for accessing streams. You need to enter some value here, it shouldn't be blank because it's used for stats calculation purposes. It's /vod/ in this example. 
  • You may also set up Domain if you'd like this route to process only specific domains. You may leave it blank if you don't plan putting any limitations.

In section 2 you need to fill in Path field with full path to your content in your file system.

Then you need to select which Nimble Streamer instances will get these settings. So you may apply them to any number of instances at once in just a few clicks.

Once the route is set up, you may request any of the uploaded files via any protocol you need:

  • http://server_IP:8081/vod/sample_file.mp4/manifest.mpd - DASH
  • http://server_IP:8081/vod/sample_file.mp4/playlist.m3u8 - HLS
  • http://server_IP:8081/vod/sample_file.mp4 - progressive download

You may also change default port 8081 to any other port by changing server config.

4. Stream the content


With streaming URLs ready for further use, you may now add them to your player. MPEG-DASH streaming of Nimble Streamer was tested with DASH reference player as well as with Bitmovin's bitdash™ player. If you find any other players more suitable for you - please share your experience with us.

Using Nimble Streamer in your streaming infrastructure, you can get DASH streaming statistics via WMSPanel reporting SaaS. It has built-in support so you don't need to parse logs or anything like that - Nimble will send required metrics to central service for your convenience.


We will extend DASH feature set with all scenarios available for HLS. This includes live streaming and a paywall feature set. Please contact us if you need to cover some specific use cases or if you just have any feedback about DASH handling in Nimble Streamer.

Related documentation


Nimble Streamer, DASH industry forum, HLS VOD streaming, HLS live streaming,

Making MPEG-DASH from RTMP: ABR streaming via Nimble Streamer

$
0
0
Nimble Streamer team keeps exploring MPEG-DASH capabilities. In addition to MPEG-DASH VOD streaming introduced, we've continued moving towards live streaming support. Today we release RTMP to MPEG-DASH transmuxing. Nimble Streamer may take published RTMP as well as pull stream from RTMP source and transmux it into DASH in live mode.

To use this capability you need to install Nimble Streamer and then define RTMP settings - either specify RTMP publish settings or RTMP pulled streams. Once it's done, you'll be able to get live MPEG-DASH streams for single bitrates as well as make ABR streams from them.

Let's go step by step and see how it works.


1. Install Nimble Streamer


Use this installation instruction. Or ask us to install it for you, we can do it free of charge.

To take RTMP streams for transmuxing, you need to specify available sources. After that Nimble will pick them up and start producing HLS chunks for immediate use.

Go to Nimble Streamer -> Live Streams Set Up menu to see list of available servers.

Available Nimble Streamer instances.
Then choose a server to make settings. Most of actions may be applied to multiple servers at once so you can choose any of them.

Incoming streams settings.
Now click on RTMP settings button to proceed with any of 2 possible scenarios:
a) get published RTMP streams;
b) pull RTMP streams.

You may combine both scenarios and process both types of incoming streams to get both HLS and MPEG-DASH outgoing streams.

2.a Publish scenario: Set up RTMP publish settings

Applications' settings

Going into RTMP settings page, first you'll see several tabs. First one you need is Global. These are global server settings. These are as follows.
  • Default chunk duration used for outgoing streams
  • Protocols which will be produced - you can generate all 4 supported types or just one of them, it does not affect the performance much.
  • Push login and password for published streams - they will be used by default for published streams.

Global server settings.

You may also define individual applications' settings. Go to Applications tab to add new apps. Each app has the same set of fields as Global server settings.

Individual applications' settings.

New application settings.
You may apply new application settings to several Nimble servers instances. Just click on their names' checkboxes in the dialog - the setting will be applied to each server within a few seconds.

Add interface


To make Nimble Streamer capable of getting published RTMP streams, it needs to listen to a specific interface - address and port. Go to Interfaces tab and click on Add interface.

Interfaces list.
You'll see a dialog for specifying an address and a port to listen to. You may leave IP address blank, in this case Nimble will listen to all IP addresses available.

You may also apply new settings to multiple servers to convenience of administration.

Adding new interface to process RTMP publishing.

If you have only published streams, then you can move to step 3.

2.b Pull scenario: Set up RTMP pull settings


If your streaming content is available via available RTMP streams, you may pull them into Nimble instances for further transmuxing. To make proper settings, go to Live pull settings tab. 

Pulled RTMP streams list.

There you click on Add URL button to see new dialog for adding new stream to transmux. There you enter:
  • URL - the address of RTMP stream.
  • Fallback URLs - if you have multiple sources of the same stream, you may specify them to make robust streaming, so if main stream goes down, secondary streams could be used.
  • Application and stream are the the names which will be used for DASH stream URL.
As already mentioned in other settings, you may apply this setting to multiple servers - just click on their names' checkboxes.

New pulled RTMP stream settings.
Once it's saved, you'll see it in settings list.

New stream in the list.

3. Outgoing streams


Having incoming streams defined and processed, you may now use the results of Nimble Streamer transmuxing for streaming your content via MPEG-DASH and any other protocol which you selected in global or application settings, e.g. HLS.

Click on Outgoing stream area on a chart or Outgoing link on top of the setup area. You will see all streams that are currently processed and ready for usage. Each stream has
  • status, 
  • names of servers which have this stream running, 
  • stream name for playback URL,
  • video and audio parameters and options,
  • link for getting playback URL - it's a question mark.

Available outgoing streams list.
To use the outgoing stream for playback, click on question mark icon to see Sample URL for player dialog.

MPEG-DASH and HLS stream names.

Here you see links for 2 protocols which you defined for this server in global settings - MPEG-DASH and HLS.

With streaming URLs ready for further use, you may now add them to your player. MPEG-DASH streaming of Nimble Streamer was tested with DASH reference player as well as with Bitmovin's bitdash™ player. If you find any other players more suitable for you - please share your experience with us.

4. Adaptive bitrate for MPEG-DASH streams


Another feature set common across HLS and MPEG-DASH streaming is adaptive bitrate streaming. It allows you to give a stream containing sub-streams with different bitrates so a player or a viewer could select appropriate bitrate according to their network conditions.

To define ABR streams, click on Adaptive stream area on a chart or ABR link on top.

ABR settings page.

Click on Add ABR stream from RTMP sources button to see the following dialog.

New ABR MPEG-DASH stream settings.

Here you need to define the following fields:
  • ABR application name and stream name - they will be used for playback by your viewers.
  • Source application name and stream name - you can add several sources from currently available single-bitrate streams. Just start typing names to see gestures listing available sources.
As in other Nimble settings, you can select multiple servers to apply these settings to. Thus you can specify ABR stream for your entire infrastructure.


Having set up the stream, you will see it in the list. Once it's synced up, it'll be shown in "online" state. To start using it, click on question mark icon to see Sample URL for player dialog.

URLs for MPEG-DASH and HLS ABR streams.

Use these URLs for further playback in your DASH-capable or HLS-capable players as previously described on step 3.


What's next


Using Nimble Streamer in your streaming infrastructure, you can get DASH streaming statistics via WMSPanel reporting SaaS. It has built-in support so you don't need to parse logs or anything like that - Nimble will send required metrics to central service for your convenience.


We will extend DASH feature set with all scenarios available for HLS. This includes features like live streaming from MPEG-TS (both UDP and HTTP). Please contact us if you need to cover some specific use cases or if you just have any feedback about DASH handling in Nimble Streamer.

Related documentation


Nimble StreamerDASH industry forum, MPEG-DASH VOD streamingHLS VOD streamingHLS live streaming

MPEG-DASH hotlink protection and paywall

$
0
0
Nimble Streamer team keeps working on MPEG-DASH feature set. In addition to MPEG-DASH VOD streaming and RTMP to DASH live transmuxing, we've continued implementing features already existing for HLS.

One of the most popular feature sets of Nimble Streamer and WMSPanel is content protection. It allows creating easy-to-use paywalls and embedding them into existing websites. Major available features are hotlinking protection and pay-per-view framework.

Hotlinking protection


Hotlinking protection allows preventing "links hi-jacking". When you publish some media behind the paywall, anyone can take the direct URL to content and pass it to anyone else. Nimble Streamer allows preventing that. This is how it works.

  1. You modify a webpage which shows a media link to include a "signature" - the URL parameter which is based on a secret password and viewer's IP address
  2. You also set up protection rules in WMSPanel where you describe which streams are affected and what password will be used.
  3. When a viewer requests the media from the media server, Nimble Streamer checks the signature against the viewer's IP and encrypted password. If they match, the connection is established, if they don't then it will be forbidden.

This scenario works already for HLS and progressive download already. Now it works perfectly for MPEG-DASH.

Hotlinking protection for MPEG-DASH workflow diagram.


Read this article to learn how to set up hotlinking protection for supported media protocols.

Pay-per-view 


Many of our customers need some mechanism of users' limitation based on consumed media. This usually covers pay-per-view, pay-per-minute and periodical subscription. Nimble Streamer allows setting up a framework for covering these areas.

These are the steps for a customer to integrate those capabilities into customer's workflow:

  1. Implement pay-per-view API handler which is able to accept POST requests.
  2. Enter that handler's URL in WMSPanel.
  3. Add a signature into existing media links, like it is done for hotlinking protection. Each signature contains a secret password and an ID of the user which the URL is shown to.


Now having that, the general workflow is as follows:

  1. Nimble Streamer sends request to handler on a periodical basis. The sync contains all users' IDs, IPs, view time and streams names.
  2. Customer handler makes required decisions based on company business logic and sends response to Nimble. This response specifies which users must be blocked from watching media.
  3. Blocked users are shut down immediately, while others keep watching.
  4. When a user is allowed to watch, he is removed from block list.

Pay-per-view for MPEG-DASH workflow diagram.

Read this article for details about the setup and shows code examples. Please also read this guide from one of our customers about the deployment of pay-per-view framework based on WMSPanel technologies.


The described features allow building basic content protection scenarios for all protocols supported by Nimble Streamer including HLS, MPEG-DASH and progressive download.

Going forward we will extend DASH feature set with all infrastructure scenarios available for HLS. Please contact us if you need to cover some specific use cases or if you just have any feedback about DASH handling in Nimble Streamer.

Related documentation


Nimble StreamerDASH industry forumMPEG-DASH VOD streaming, MPEG-DASH live streaming from RTMPHLS VOD streamingHLS live streaming, Paywall feature set for Nimble Streamer and Wowza,

SSL support for HLS, MPEG-DASH, Icecast and MPEG-TS

$
0
0
Secure streaming is required in several scenarios in our customers' environments. This is why we are working on implementing security feature set. One of the high-demand features is SSL streaming for HLS, MPEG-DASH, MPEG-TS, Icecast and progressive download via Nimble Streamer. In this case streams are available via HTTPS protocols stack.

Nimble Streamer team has implemented this feature.

To set up HTTPS streaming, you need to generate SSL certificate first. This is done separately and you can read articles here to see an example of such activity. Usually SSL certificates are purchased by some provider like GoDaddy and these companies provide plenty of information about this process.

In this article we assume:

  • you already have a certificate for further setup,
  • your certificate and its key are located at your server and 
  • they are ready for further usage.

You will need to make changes to Nimble Streamer settings to make it work for your media streaming. These settings are stored in /etc/nimble/nimble.conf file.

Add the following parameters:

  • ssl_port - this is port number for SSL connections.
  • ssl_certificate - full path to certificate located at your server
  • ssl_certificate_key - full path to certificate key located at your server
  • ssl_certificate_key_pass - if you use encryption for your certificate key, you need to specify a password here. This is optional parameter, so if you don't use encryption, just don't add it into the config.

By default, Nimble Streamer handles connections via the port specified in config at "port" parameter. Usually it's port 8081. If you need Nimble Streamer to handle connections via SSL only, please set this parameter to 0, like this:
port = 0

If it has some other value, Nimble still handles streaming connections through 2 ports via both HTTP and HTTPS. If you remove "port" parameter, Nimble will use default value "8081"

To apply config changes please re-start Nimble by running:
sudo service nimble restart

You can read more about Nimble Streamer parameters in this reference article.

With these settings you can stream MPEG-DASH, HLS, Icecast, MPEG-TS and progressive download via HTTPS.


Please feel free to install Nimble Streamer to try this and other security-related features in action. Contact us in case of any questions.

Related documentation


WMSPanelNimble StreamerHotlink protection for Nimble StreamerPaywall for Nimble Streamer, Live HLS streaming, VOD HLS streaming,

Geo-location statistics for states and regions

$
0
0
WMSPanel reporting for media servers of various types has several types of metrics. Geo-location reporting is one of the most popular ones. It's part of daily statistics for particular data slice and it shows total number of connections established within selected dates range.

Today we introduce a highly anticipated improvement - geo-location stats how have extra information about regions within countries. Best example is a state within countries the United States of America or Brazil.

You can go to Reporting -> Geo stats menu to see a reporting page. This page contains a map representing views share and a list of countries, each having total number of connections and percents of share. You may select dates range to report and also export your data via CSV file.

List of countries in geo-location reporting.

Clicking on country name shows list of regions (e.g. states) list, each having total connections number and percentage.

List of states for USA in geo-location reporting.

Clicking on a region shows the list of cities in it, each having its own stats.

List of cities of a country in geo-location report.

With the additional regions metrics you will have full picture of your audience in any given country.

Read more about WMSPanel streaming reporting.Contact us if you have any questions about it.


Related documentation


End user reporting for WowzaDaily statisticsISP networks reportData slices for statisticsDevices and Players report for WowzaStreamed slices for WowzaScreencast for daily statisticsStatistics import APIGeo and IP range restriction for WowzaNimble Streamer geo-location restriction

This product includes GeoLite data created by MaxMind(c), available from http://www.maxmind.com

Cross-domain policy and access control in Nimble Streamer

$
0
0
Protecting web clients against vulnerabilities is one of the core features for safe web browsing. This is why popular platforms use various mechanisms to improve the security. This also includes video playback scenarios. That's why Nimble Streamer needs to cover them.

Cross-domain policy file


For instance, many web media players use the "crossdomain.xml" file. It's a cross-domain policy file which gives the player permission to talk to servers other than the one it's hosted on.

As per Adobe, a cross-domain policy file is an XML document that grants a web client permission to handle data across multiple domains. When a client hosts content from a particular source domain and that content makes requests directed towards a domain other than its own, the remote domain would need to host a cross-domain policy file that grants access to the source domain, allowing the client to continue with the transaction.

Nimble Streamer allows specifying this file content. It is done via configuration file located at /etc/nimble/nimble.conf . Please refer to Nimble config file format for more details.

Use the following parameter to specify the domain within the XML file:
crossdomain_xml_allow_access_from_domain = <your.domain>
E.g. crossdomain_xml_allow_access_from_domain = wmspanel.com

If you'd like to define complete file content, you can create crossdomain.xml with XML based on Adobe's spec examples, like this:
<?xml version="1.0"?><cross-domain-policy><allow-access-from domain="*" secure="false"/></cross-domain-policy>
Once it's ready, save it to local directory and point Nimble to it via crossdomain_xml parameter:
crossdomain_xml = /etc/nimble/crossdomain.xml
The file content will be returned to a client as soon as it's requested.

Cross-origin resource sharing


Another technique is cross-origin resource sharing. Players may require Access-Control-Allow* headers in server responses. You can use the following parameters for that:
access_control_allow_origin = <some value>
access_control_allow_credentials = <some value>
Possible values are
access_control_allow_origin = *
access_control_allow_credentials = true
or
access_control_allow_origin = http://your.domain.com
You may refer to W3C to get more details.


Important
: to apply config changes, please re-start Nimble instance by running:
sudo service nimble restart

Please read more about config file format here.


Related documentation


Nimble StreamerNimble Streamer APINimble Streamer configurationNimble Streamer performance tuning, SSL support for HLS, DASH, Icecast and MPEG-TS streaming,
Viewing all 436 articles
Browse latest View live